hmdp - 好友关注
好友关注
关注和取消关注
针对用户的操作:可以对用户进行关注和取消关注功能。
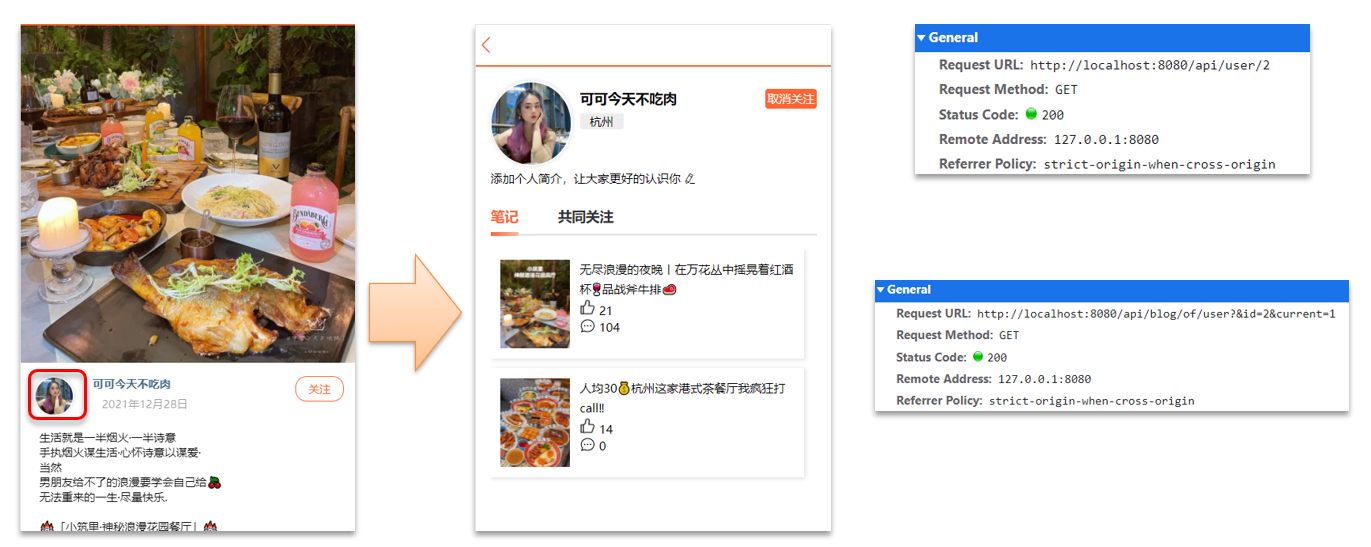
在探店图文的详情页面中,可以关注发布笔记的作者

实现思路:
需求:基于该表数据结构,实现两个接口:
- 关注和取关接口
- 判断是否关注的接口
关注是User之间的关系,是博主与粉丝的关系,数据库中有一张tb_follow表来标示:
CREATE TABLE `tb_follow`  (
  `id` bigint(20) NOT NULL AUTO_INCREMENT COMMENT '主键',
  `user_id` bigint(20) UNSIGNED NOT NULL COMMENT '用户id',
  `follow_user_id` bigint(20) UNSIGNED NOT NULL COMMENT '关联的用户id',
  `create_time` timestamp NOT NULL DEFAULT CURRENT_TIMESTAMP COMMENT '创建时间',
  PRIMARY KEY (`id`) USING BTREE
) ENGINE = InnoDB AUTO_INCREMENT = 1 CHARACTER SET = utf8mb4 COLLATE = utf8mb4_general_ci ROW_FORMAT = Compact;
2
3
4
5
6
7
FollowController
//关注
@PutMapping("/{id}/{isFollow}")
public Result follow(@PathVariable("id") Long followUserId, @PathVariable("isFollow") Boolean isFollow) {
    return followService.follow(followUserId, isFollow);
}
//取消关注
@GetMapping("/or/not/{id}")
public Result isFollow(@PathVariable("id") Long followUserId) {
      return followService.isFollow(followUserId);
}
2
3
4
5
6
7
8
9
10
FollowService
取消关注service
@Override
public Result isFollow(Long followUserId) {
        // 1.获取登录用户
        Long userId = UserHolder.getUser().getId();
        // 2.查询是否关注 select count(*) from tb_follow where user_id = ? and follow_user_id = ?
        Integer count = query().eq("user_id", userId).eq("follow_user_id", followUserId).count();
        // 3.判断
        return Result.ok(count > 0);
    }

 关注service
 @Override
    public Result follow(Long followUserId, Boolean isFollow) {
        // 1.获取登录用户
        Long userId = UserHolder.getUser().getId();
        String key = "follows:" + userId;
        // 1.判断到底是关注还是取关
        if (isFollow) {
            // 2.关注,新增数据
            Follow follow = new Follow();
            follow.setUserId(userId);
            follow.setFollowUserId(followUserId);
            boolean isSuccess = save(follow);

        } else {
            // 3.取关,删除 delete from tb_follow where user_id = ? and follow_user_id = ?
            remove(new QueryWrapper<Follow>()
                    .eq("user_id", userId).eq("follow_user_id", followUserId));

        }
        return Result.ok();
    }
2
3
4
5
6
7
8
9
10
11
12
13
14
15
16
17
18
19
20
21
22
23
24
25
26
27
28
29
30
31
32
33
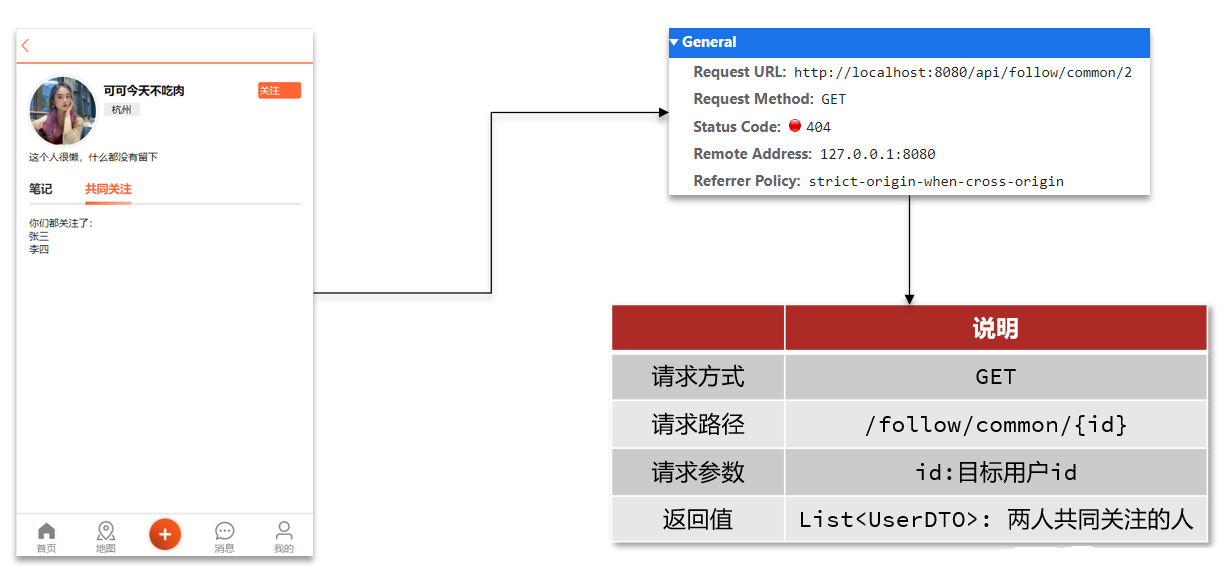
共同关注
想要去看共同关注的好友,需要首先进入到这个页面,这个页面会发起两个请求
去查询用户的详情
去查询用户的笔记
以上两个功能和共同关注没有什么关系,大家可以自行将笔记中的代码拷贝到idea中就可以实现这两个功能了,我们的重点在于共同关注功能。
// UserController 根据id查询用户
@GetMapping("/{id}")
public Result queryUserById(@PathVariable("id") Long userId){
	// 查询详情
	User user = userService.getById(userId);
	if (user == null) {
		return Result.ok();
	}
	UserDTO userDTO = BeanUtil.copyProperties(user, UserDTO.class);
	// 返回
	return Result.ok(userDTO);
}

// BlogController  根据id查询博主的探店笔记
@GetMapping("/of/user")
public Result queryBlogByUserId(
		@RequestParam(value = "current", defaultValue = "1") Integer current,
		@RequestParam("id") Long id) {
	// 根据用户查询
	Page<Blog> page = blogService.query()
			.eq("user_id", id).page(new Page<>(current, SystemConstants.MAX_PAGE_SIZE));
	// 获取当前页数据
	List<Blog> records = page.getRecords();
	return Result.ok(records);
}
2
3
4
5
6
7
8
9
10
11
12
13
14
15
16
17
18
19
20
21
22
23
24
25
共同关注的实现:
- 需求:利用Redis中恰当的数据结构,实现共同关注功能。在博主个人页面展示出当前用户与博主的共同关注呢。
使用set集合,在set集合中,有交集并集补集的api,我们可以把两人的关注的人分别放入到一个set集合中,然后再通过api去查看这两个set集合中的交集数据。
改造当前的关注列表
改造原因是因为我们需要在用户关注了某位用户后,需要将数据放入到set集合中,方便后续进行共同关注,同时当取消关注时,也需要从set集合中进行删除
FollowServiceImpl
@Override
public Result follow(Long followUserId, Boolean isFollow) {
    // 1.获取登录用户
    Long userId = UserHolder.getUser().getId();
    String key = "follows:" + userId;
    // 1.判断到底是关注还是取关
    if (isFollow) {
        // 2.关注,新增数据
        Follow follow = new Follow();
        follow.setUserId(userId);
        follow.setFollowUserId(followUserId);
        boolean isSuccess = save(follow);
        if (isSuccess) {
            // 把关注用户的id,放入redis的set集合 sadd userId followerUserId
            stringRedisTemplate.opsForSet().add(key, followUserId.toString());
        }
    } else {
        // 3.取关,删除 delete from tb_follow where user_id = ? and follow_user_id = ?
        boolean isSuccess = remove(new QueryWrapper<Follow>()
                .eq("user_id", userId).eq("follow_user_id", followUserId));
        if (isSuccess) {
            // 把关注用户的id从Redis集合中移除
            stringRedisTemplate.opsForSet().remove(key, followUserId.toString());
        }
    }
    return Result.ok();
}
2
3
4
5
6
7
8
9
10
11
12
13
14
15
16
17
18
19
20
21
22
23
24
25
26
27
具体的关注代码:
FollowServiceImpl
@Override
public Result followCommons(Long id) {
    // 1.获取当前用户
    Long userId = UserHolder.getUser().getId();
    String key = "follows:" + userId;
    // 2.求交集
    String key2 = "follows:" + id;
    Set<String> intersect = stringRedisTemplate.opsForSet().intersect(key, key2);
    if (intersect == null || intersect.isEmpty()) {
        // 无交集
        return Result.ok(Collections.emptyList());
    }
    // 3.解析id集合
    List<Long> ids = intersect.stream().map(Long::valueOf).collect(Collectors.toList());
    // 4.查询用户
    List<UserDTO> users = userService.listByIds(ids)
            .stream()
            .map(user -> BeanUtil.copyProperties(user, UserDTO.class))
            .collect(Collectors.toList());
    return Result.ok(users);
}
2
3
4
5
6
7
8
9
10
11
12
13
14
15
16
17
18
19
20
21
关注推送
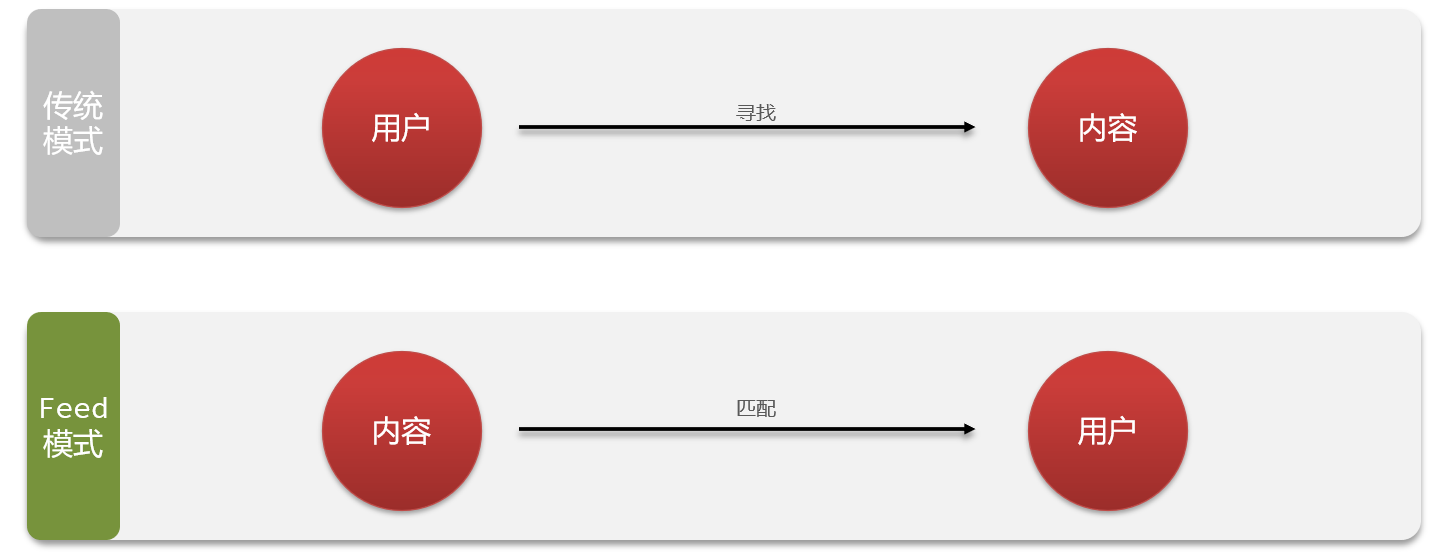
关注推送也叫做Feed流,直译为投喂。为用户持续的提供“沉浸式”的体验,通过无限下拉刷新获取新的信息。
- 对于传统的模式的内容解锁:需要用户去通过搜索引擎或者是其他的方式去解锁想要看的内容
- 对于新型的Feed流的的效果:不需要用户再去推送信息,而是系统分析用户到底想要什么,然后直接把内容推送给用户,从而使用户能够更加的节约时间,不用主动去寻找。
Feed流产品有两种常见模式:
Timeline:不做内容筛选,简单的按照内容发布时间排序,常用于好友或关注。例如朋友圈
优点:信息全面,不会有缺失。并且实现也相对简单
缺点:信息噪音较多,用户不一定感兴趣,内容获取效率低
智能排序:利用智能算法屏蔽掉违规的、用户不感兴趣的内容。推送用户感兴趣信息来吸引用户
优点:投喂用户感兴趣信息,用户粘度很高,容易沉迷
缺点:如果算法不精准,可能起到反作用
本例中的个人页面,是基于关注的好友来做Feed流,因此采用Timeline的模式。该模式的实现方案有三种:
- 拉模式
- 推模式
- 推拉结合
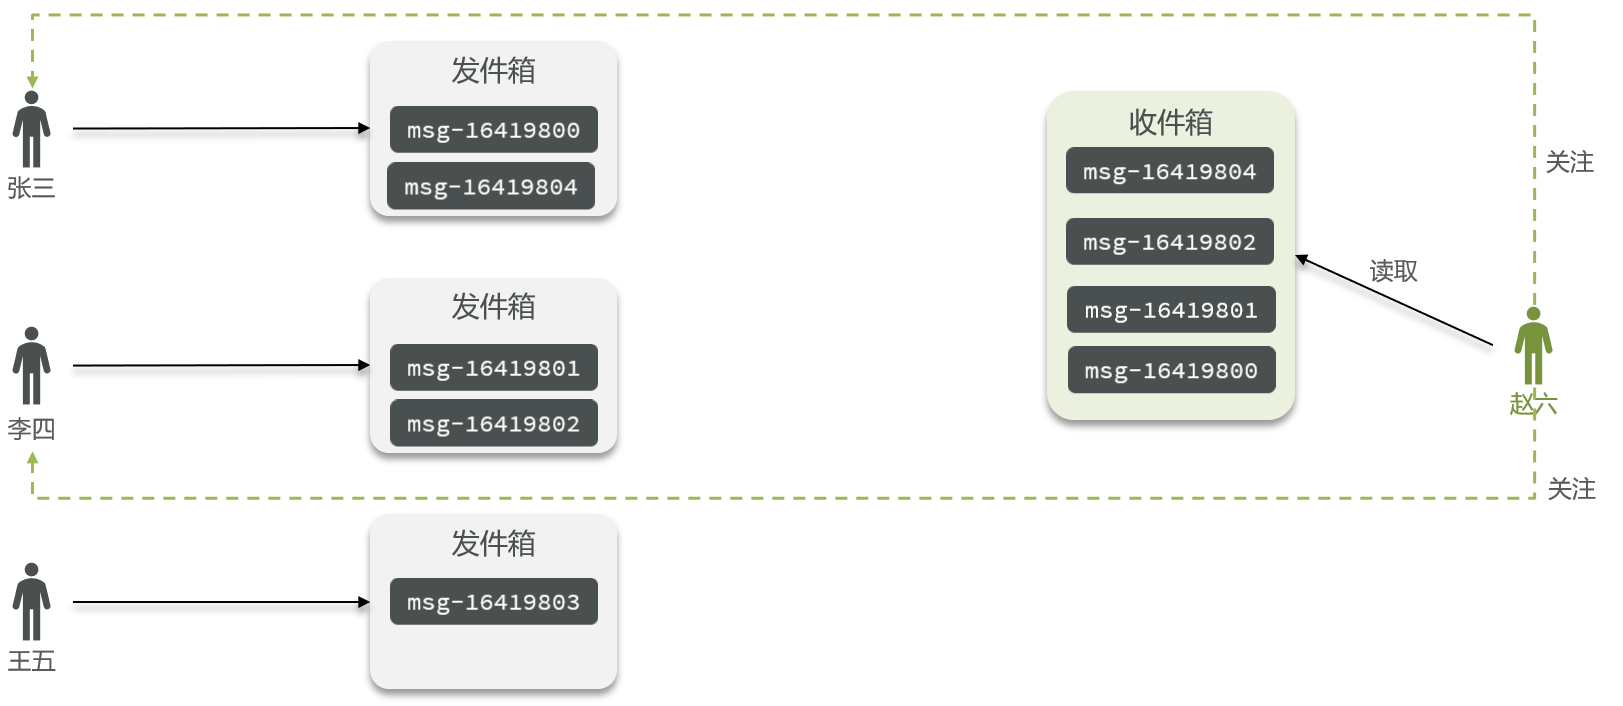
Feed流的实现方案1——拉模式
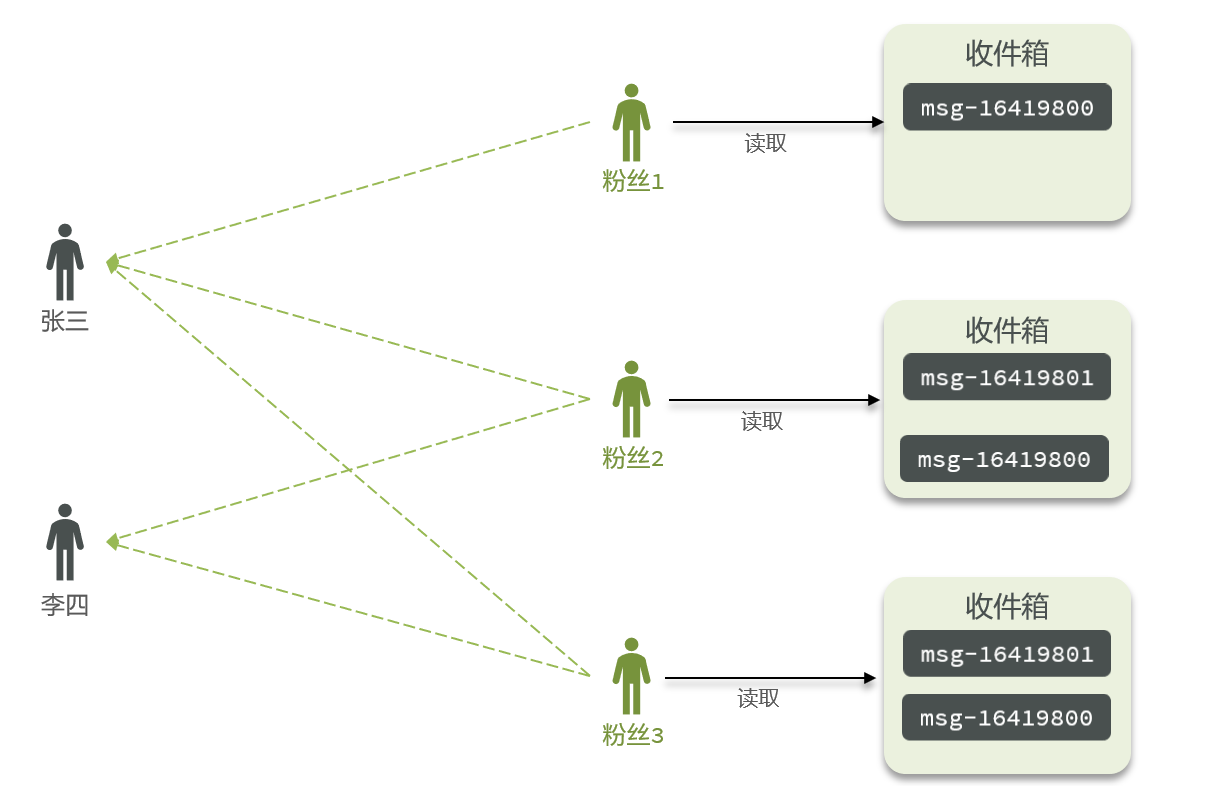
拉模式:也叫做读扩散
核心含义:当张三和李四和王五发了消息后,都会保存在自己的邮箱中,假设赵六要读取信息,那么他会从读取他自己的收件箱,此时系统会从他关注的人群中,把他关注人的信息全部都进行拉取,然后在进行排序。
优点:比较节约空间,因为赵六在读信息时,并没有重复读取,而且读取完之后可以把他的收件箱进行清除。
缺点:比较延迟,当用户读取数据时才去关注的人里边去读取数据,假设用户关注了大量的用户,那么此时就会拉取海量的内容,对服务器压力巨大。
Feed流的实现方案2——推模式
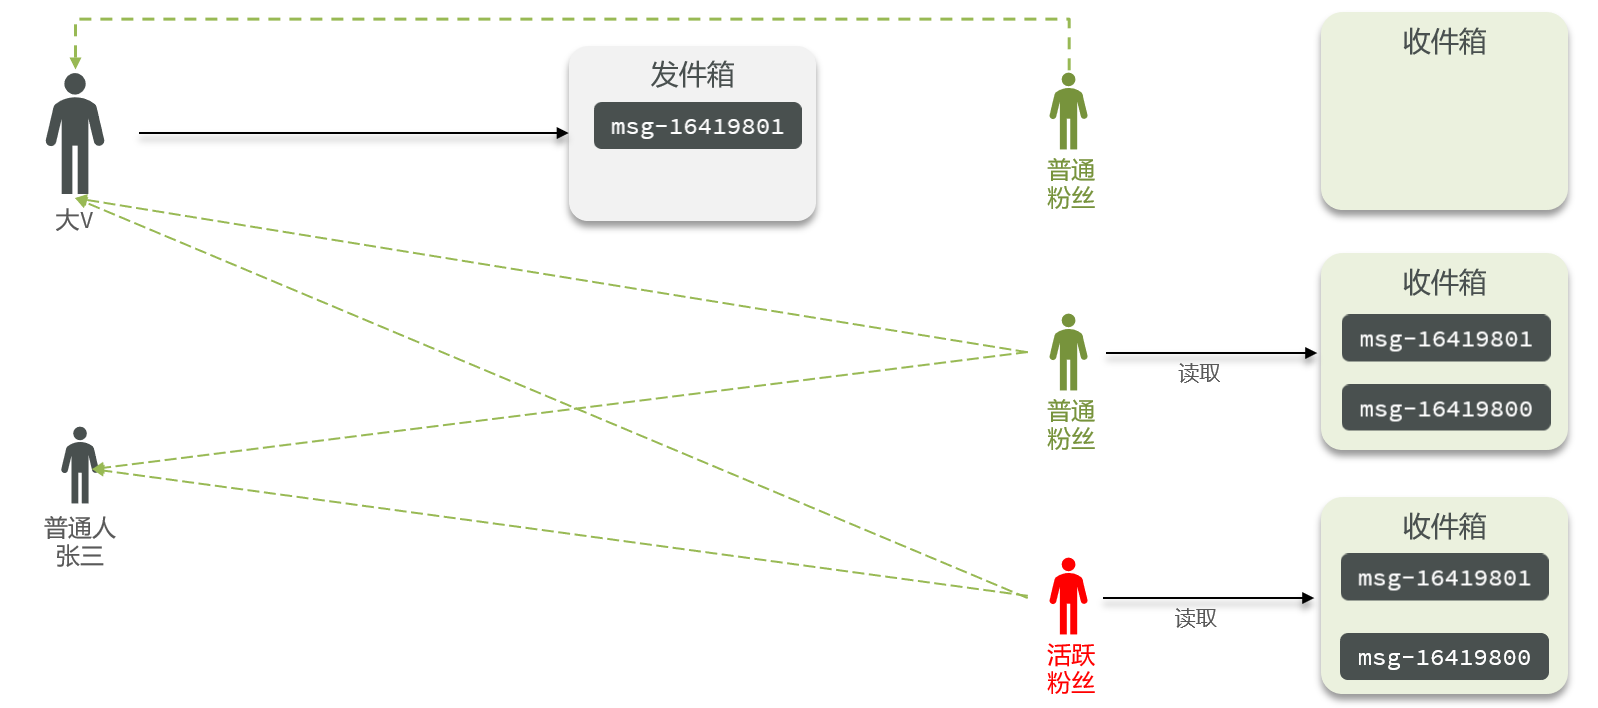
推模式:也叫做写扩散。
推模式是没有写邮箱的,当张三写了一个内容,此时会主动的把张三写的内容发送到他的粉丝收件箱中去,假设此时李四再来读取,就不用再去临时拉取了
优点:时效快,不用临时拉取
缺点:内存压力大,假设一个大V写信息,很多人关注他, 就会写很多份数据(同一内容)到粉丝那边去。
Feed流的实现方案2——推拉模式
推拉结合模式:也叫做读写混合,兼具推和拉两种模式的优点。
推拉模式是一个折中的方案:
- 发件人:
- 普通发件人:采用写扩散的方式,直接把数据写入到他的粉丝中去,因为普通的人他的粉丝关注量比较小,所以这样做没有压力
- ·微博大V:直接将数据先写入到一份到发件箱里边去,然后再直接写一份到活跃粉丝收件箱里边去
- 收件人:
- 活跃粉丝:那么大V和普通的人发的都会直接写入到自己收件箱里边来;
- 普通粉丝:由于他们上线不是很频繁,所以等他们上线时,再从发件箱里边去拉信息。
Feed流的实现方案对比
| 拉模式 | 推模式 | 推拉结合 | |
|---|---|---|---|
| 写比例 | 低 | 高 | 中 |
| 读比例 | 高 | 低 | 中 |
| 用户读取延迟 | 高 | 低 | 低 |
| 实现难度 | 复杂 | 简单 | 很复杂 |
| 使用场景 | 很少使用 | 用户量少,没有大V | 过千万的用户量,有大V |
基于推模式实现关注推送功能
需求:
- 修改新增探店笔记的业务,在保存blog到数据库的同时,推送到粉丝的收件箱
- 收件箱满足可以根据时间戳排序,必须用Redis的数据结构实现
- 查询收件箱数据时,可以实现分页查询
Feed流中的数据会不断更新,所以数据的角标也在变化,因此不能采用传统的分页模式。
传统分页
- 在t1时刻,读取第一页,此时page = 1 ,size = 5 ,拿到的就是10~6 这几条记录,
- 在t2时刻,又发布了一条记录;
- 在t3 时刻,来读取第二页,读取第二页传入的参数是page=2 ,size=5 ,那么此时读取到的第二页实际上是从6 开始,然后是6~2 ,那么我们就读取到了重复的数据,所以feed流的分页,不能采用原始方案来做。
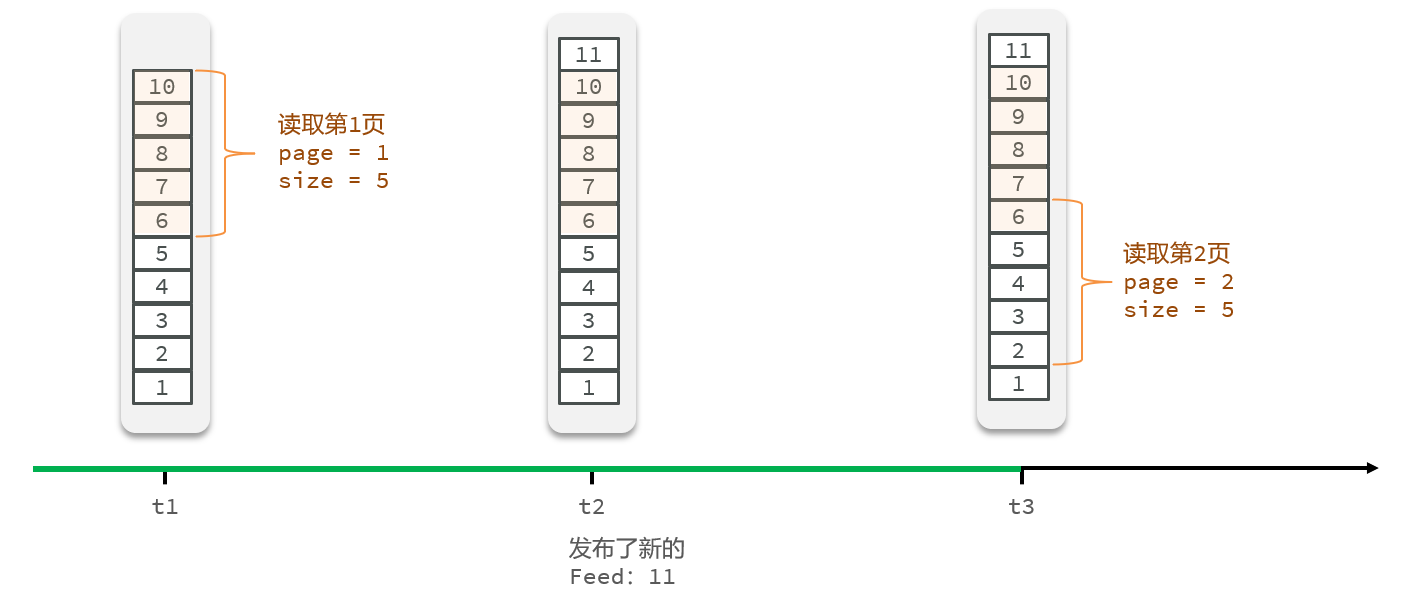
滚动分页
需要记录每次操作的最后一条,然后从这个位置开始去读取数据
- 在t1时刻,开始拿第一页数据,拿到了10~6,然后记录下当前最后一次拿取的记录,就是6,
- 在t2时刻,发布了新的记录,此时这个11放到最顶上,但是不会影响我们之前记录的6,
- 在t3时刻,来拿第二页,第二页这个时候拿数据,还是从6后一点的5去拿,就拿到了5-1的记录。我们这个地方可以采用sortedSet来做,可以进行范围查询,并且还可以记录当前获取数据时间戳最小值,就可以实现滚动分页了

核心思想:在保存完探店笔记后,获得到当前笔记的粉丝,然后把数据推送到粉丝的redis中去。
@Override
public Result saveBlog(Blog blog) {
    // 1.获取登录用户
    UserDTO user = UserHolder.getUser();
    blog.setUserId(user.getId());
    // 2.保存探店笔记
    boolean isSuccess = save(blog);
    if(!isSuccess){
        return Result.fail("新增笔记失败!");
    }
    // 3.查询笔记作者的所有粉丝 select * from tb_follow where follow_user_id = ?
    List<Follow> follows = followService.query().eq("follow_user_id", user.getId()).list();
    // 4.推送笔记id给所有粉丝
    for (Follow follow : follows) {
        // 4.1.获取粉丝id
        Long userId = follow.getUserId();
        // 4.2.推送
        String key = FEED_KEY + userId;
        stringRedisTemplate.opsForZSet().add(key, blog.getId().toString(), System.currentTimeMillis());
    }
    // 5.返回id
    return Result.ok(blog.getId());
}
2
3
4
5
6
7
8
9
10
11
12
13
14
15
16
17
18
19
20
21
22
23
实现分页查询收邮箱
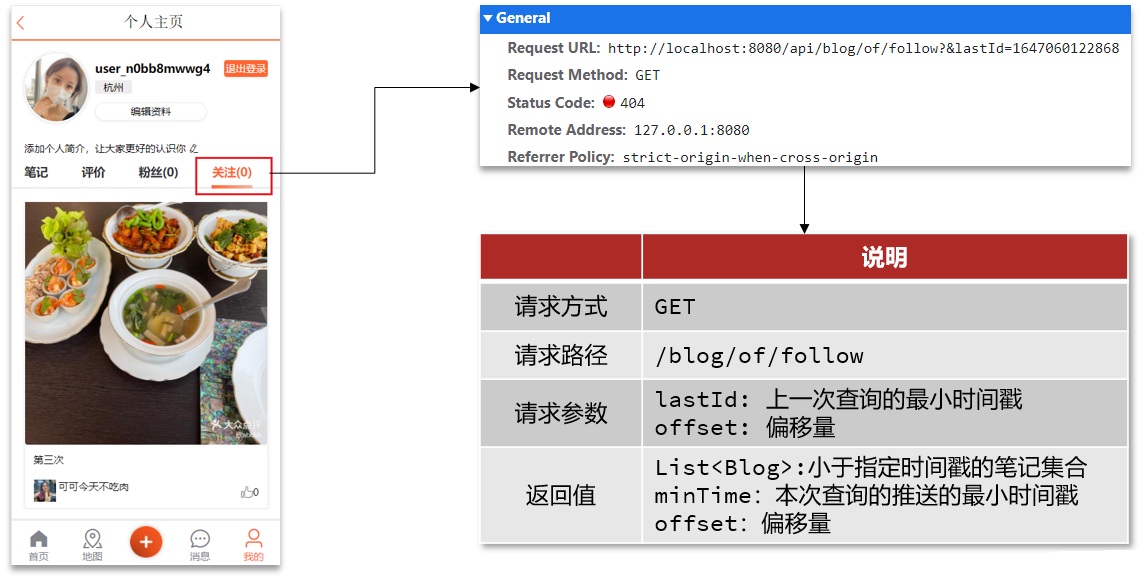
需求:在个人主页的“关注”卡片中,查询并展示推送的Blog信息:
具体操作如下:
- 每次查询完成后,我们要分析出查询出数据的最小时间戳,这个值会作为下一次查询的条件
- 我们需要找到与上一次查询相同的查询个数作为偏移量,下次查询时,跳过这些查询过的数据,拿到我们需要的数据
综上:我们的请求参数中就需要携带 lastId:上一次查询的最小时间戳 和偏移量 这两个参数。
这两个参数第一次会由前端来指定,以后的查询就根据后台结果作为条件,再次传递到后台。
定义出来具体的返回值实体类
@Data
public class ScrollResult {
    private List<?> list;
    private Long minTime;
    private Integer offset;
}
2
3
4
5
6
BlogController
注意:RequestParam 表示接受url地址栏传参的注解,当方法上参数的名称和url地址栏不相同时,可以通过RequestParam 来进行指定
@GetMapping("/of/follow")
public Result queryBlogOfFollow(
    @RequestParam("lastId") Long max, @RequestParam(value = "offset", defaultValue = "0") Integer offset){
    return blogService.queryBlogOfFollow(max, offset);
}
2
3
4
5
BlogServiceImpl
@Override
public Result queryBlogOfFollow(Long max, Integer offset) {
    // 1.获取当前用户
    Long userId = UserHolder.getUser().getId();
    // 2.查询收件箱 ZREVRANGEBYSCORE key Max Min LIMIT offset count
    String key = FEED_KEY + userId;
    Set<ZSetOperations.TypedTuple<String>> typedTuples = stringRedisTemplate.opsForZSet()
        .reverseRangeByScoreWithScores(key, 0, max, offset, 2);
    // 3.非空判断
    if (typedTuples == null || typedTuples.isEmpty()) {
        return Result.ok();
    }
    // 4.解析数据:blogId、minTime(时间戳)、offset
    List<Long> ids = new ArrayList<>(typedTuples.size());
    long minTime = 0; // 2
    int os = 1; // 2
    for (ZSetOperations.TypedTuple<String> tuple : typedTuples) { // 5 4 4 2 2
        // 4.1.获取id
        ids.add(Long.valueOf(tuple.getValue()));
        // 4.2.获取分数(时间戳)
        long time = tuple.getScore().longValue();
        if(time == minTime){
            os++;
        }else{
            minTime = time;
            os = 1;
        }
    }
	os = minTime == max ? os : os + offset;
    // 5.根据id查询blog
    String idStr = StrUtil.join(",", ids);
    List<Blog> blogs = query().in("id", ids).last("ORDER BY FIELD(id," + idStr + ")").list();

    for (Blog blog : blogs) {
        // 5.1.查询blog有关的用户
        queryBlogUser(blog);
        // 5.2.查询blog是否被点赞
        isBlogLiked(blog);
    }

    // 6.封装并返回
    ScrollResult r = new ScrollResult();
    r.setList(blogs);
    r.setOffset(os);
    r.setMinTime(minTime);

    return Result.ok(r);
}
2
3
4
5
6
7
8
9
10
11
12
13
14
15
16
17
18
19
20
21
22
23
24
25
26
27
28
29
30
31
32
33
34
35
36
37
38
39
40
41
42
43
44
45
46
47
48