Tars - Gateway部署
本节主要介绍TarsGateway服务开发和编译时需要的开发环境。
TarsGateway
支持一键安装(需要先具备tarscpp编译环境)
    git clone https://github.com/TarsCloud/TarsGateway.git
    cd TarsGateway/install;
    ./install.sh webhost token server_ip tars_db_ip tars_db_port tars_db_user tars_db_pwd
1
2
3
2
3
安装参数如下:
- webhost TarsWeb管理端的host或ip:port
- token TarsWeb管理端的token,可以通过管理端获取http://webhost:3001/auth.html#/token
- server_ip GatewayServer部署的ip,目前这里只支持一个,如果需要更多,后面直接在平台上面扩容即可。
- tars_db_ip tarsdb 所在的数据库服务器ip。
- tars_db_port tarsdb 端口。
- tars_db_user tarsdb 用户名(需要有建库建表权限)。
- tars_db_pwd tarsdb 密码。
例如:
./install.sh 172.25.0.3:3000 daee564ccadab831cbdf4bb2de719e602b66236e 172.25.0.3 172.25.0.2 3306 root 123456
1
docker 给运行中的容器添加映射端口
DOCKER 给运行中的容器添加映射端口

方法1
1、获得容器IP

将container_name 换成实际环境中的容器名
docker inspect container_name | grep IPAddress
2、 iptable转发端口

将容器的8000端口映射到docker主机的8001端口
复制代码 代码如下:

iptables -t nat -A DOCKER -p tcp --dport 8001 -j DNAT --to-destination 172.17.0.19:8000
1
2
3
4
5
6
7
8
9
10
11
12
13
2
3
4
5
6
7
8
9
10
11
12
13
实际例子: iptables -t nat -A DOCKER -p tcp --dport 8200 -j DNAT --to-destination 172.25.0.3:8200
验证安装结果:
在浏览器打开 http://${server_ip}:8200/monitor/monitor.html , 如果能正常显示 hello TupMonitorxxx 就表示安装成功。
修改默认安装端口
将server.json中的8200端口值修改为你需要的端口,然后重新执行./install.sh步骤,最后在TarsWeb中将GatewayServer重启即可。
配置文件
<main>
    #传到后面taf服务的http头, 多个头以,分隔
    filterheaders = X-GUID|X-XUA|Host
    # 是否打开通过主控发现代理,1打开, 0 关闭
    auto_proxy=1
    flow_report_obj=Base.GatewayServer.FlowControlObj
    <base>
        # tup 回包大小限制
        rspsize=5242880
        #tup_host 如果不配置,那么所有host开头的,且没有path或者path为 / , 也判断为 tup 请求, 例如: prx.tup.whup.com|127.0.0.1|192.168.2.123
        tup_host=
        tup_path=/tup
        json_path=/json
        monitor_url=/monitor/monitor.html
    </base>
    <http_retcode>
        # 定义哪些返回码做超时容错处理,哪些返回码做出错容灾处理
        inactive=2|6
        timeout=1|3
    </http_retcode>

    <http_router>
        # 本机绑定host 来测试以下用例
        # 192.168.2.131 x.tup.cn
        # 192.168.2.131 x.tup.com
        # 192.168.2.131 x1.tup.net
        # 192.168.2.131 x.tuptest.com
        # 192.168.2.131 f.tup.com
        <station1>
            server_name=127.0.0.1
            location=/testhost/
            proxy_pass=http://127.0.0.1:8200
        </station1>
    </http_router>

    <proxy>
        hello = TestApp.HelloServer.HelloObj
        httpTest = TestApp.HttpServer.HttpObj
        Calc = TestApp.CalcServer.CalcObj
        goTest = GoApp.HelloGo.SayHelloObj

        <test>
            v = Base.LoginServer.LoginObj
            hello = Test.HelloServer.HelloObj@tcp -h 127.0.0.1 -p 22346 | 2 | X-GUID
        </test>

        <dogfood>
            v = Base.LoginServer.LoginObj
            hello = Test.HelloServer.HelloObj@tcp -h 127.0.0.1 -p 22346
        </dogfood>
    </proxy>


    #http头:值, 转到proxy某个服务
    <httpheader>
        Q-gUID:344bfdf1afb146ffa68b2bd69a57f193 = test
        Q-GUID:b7392a2d60604eac81892f6f9c0232f7 = test
    </httpheader>

    <db>
        charset=utf8
        dbhost =172.25.0.2
        dbname =db_base
        dbpass =123456
        dbport =3306
        dbuser =root
    </db>
</main>
1
2
3
4
5
6
7
8
9
10
11
12
13
14
15
16
17
18
19
20
21
22
23
24
25
26
27
28
29
30
31
32
33
34
35
36
37
38
39
40
41
42
43
44
45
46
47
48
49
50
51
52
53
54
55
56
57
58
59
60
61
62
63
64
65
66
67
68
2
3
4
5
6
7
8
9
10
11
12
13
14
15
16
17
18
19
20
21
22
23
24
25
26
27
28
29
30
31
32
33
34
35
36
37
38
39
40
41
42
43
44
45
46
47
48
49
50
51
52
53
54
55
56
57
58
59
60
61
62
63
64
65
66
67
68
重点关注:
hello = TestApp.HelloServer.HelloObj
httpTest = TestApp.HttpServer.HttpObj
Calc = TestApp.CalcServer.CalcObj
goTest = GoApp.HelloGo.SayHelloObj
1
2
3
4
2
3
4
测试Gateway
Calc.tars定义
module TestCalcApp
{

interface Calc
{
    int test();
	int add(int a,int b);
	int sub(int a,int b);
	int multiply(int a,int b);
	int divide(int a,int b);
};

};

int CalcImp::add(int a,int b, tars::TarsCurrentPtr current)
{
	int ret = a+b;
    TLOGDEBUG("CalcImp::add:"<<ret<<endl);
    return ret;
}
1
2
3
4
5
6
7
8
9
10
11
12
13
14
15
16
17
18
19
20
2
3
4
5
6
7
8
9
10
11
12
13
14
15
16
17
18
19
20
postman测试图:
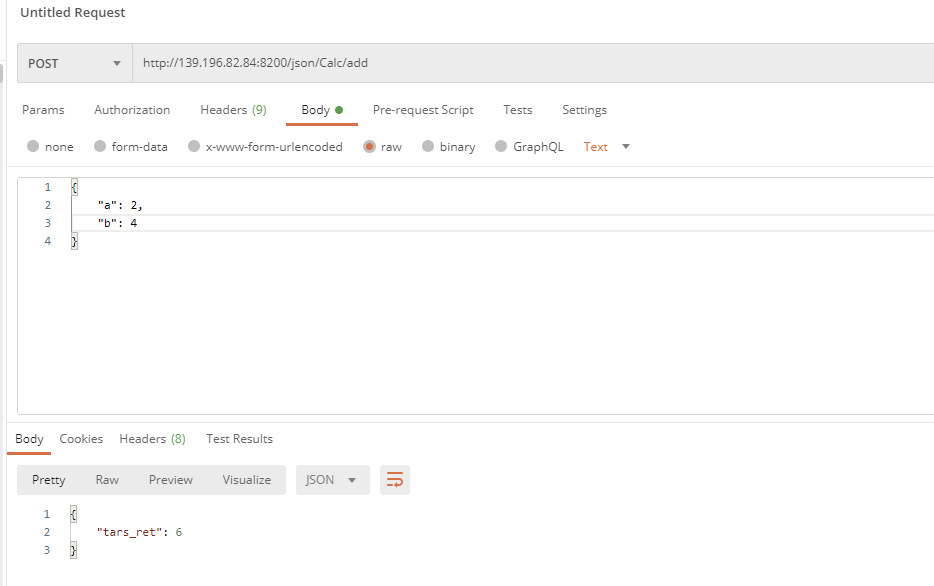
http://139.196.82.84:8200/json/Calc/add

1.http://139.196.82.84:8200 对应网关接口
2.json:定位json请求方式
3.Calc:对应上面配置文件里  Calc = TestApp.CalcServer.CalcObj
4.add:Calc.tars里面定义的方法


请求内容:
{
    "a": 2,
    "b": 4
}

返回值:
{
    "tars_ret": 6
}
1
2
3
4
5
6
7
8
9
10
11
12
13
14
15
16
17
18
19
2
3
4
5
6
7
8
9
10
11
12
13
14
15
16
17
18
19
Hello.tars定义
module TestApp
{

interface Hello
{
    int test();
	int testHello(string sReq, out string sRsp);
	int testHelloTwo(string sReq, out string sRsp);
};

};

int HelloImp::testHello(const std::string &sReq, std::string &sRsp, tars::TarsCurrentPtr current)
{
    TLOGDEBUG("HelloImp::testHellosReq:"<<sReq<<endl);
    sRsp = sReq;
    return 0;
}

这里与上面的Calc不同,int testHello(string sReq, out string sRsp)
定义输入和输出,返回值表示是否成功
1
2
3
4
5
6
7
8
9
10
11
12
13
14
15
16
17
18
19
20
21
2
3
4
5
6
7
8
9
10
11
12
13
14
15
16
17
18
19
20
21
postman测试图:
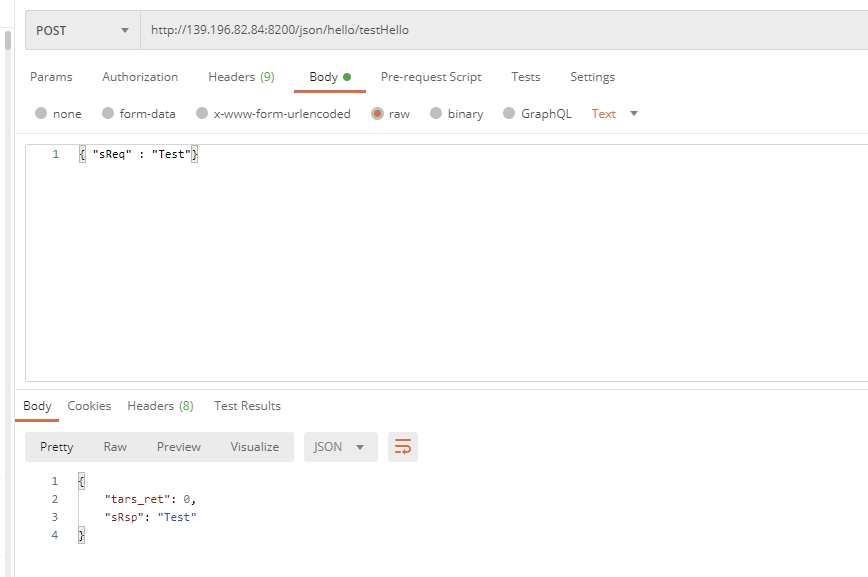
http://139.196.82.84:8200/json/hello/testHello

1.http://139.196.82.84:8200 对应网关接口
2.json:定位json请求方式
3.hello:对应上面配置文件里  hello = TestApp.HelloServer.HelloObj
4.testHello:Hello.tars里面定义的方法


请求内容:
{ "sReq" : "Test"}

返回值:
{
    "tars_ret": 0,
    "sRsp": "Test"
}
1
2
3
4
5
6
7
8
9
10
11
12
13
14
15
16
17
2
3
4
5
6
7
8
9
10
11
12
13
14
15
16
17
SayHello.tars
module GoApp
{
	interface SayHello
	{
	    int Add(int a,int b,out int c); // Some example function
	    int Sub(int a,int b,out int c); // Some example function
	};
};

func (imp *SayHelloImp) Add(ctx context.Context, a int32, b int32, c *int32) (int32, error) {
	*c = a + b
	return 0, nil
}
1
2
3
4
5
6
7
8
9
10
11
12
13
2
3
4
5
6
7
8
9
10
11
12
13
postman测试图(go语言):
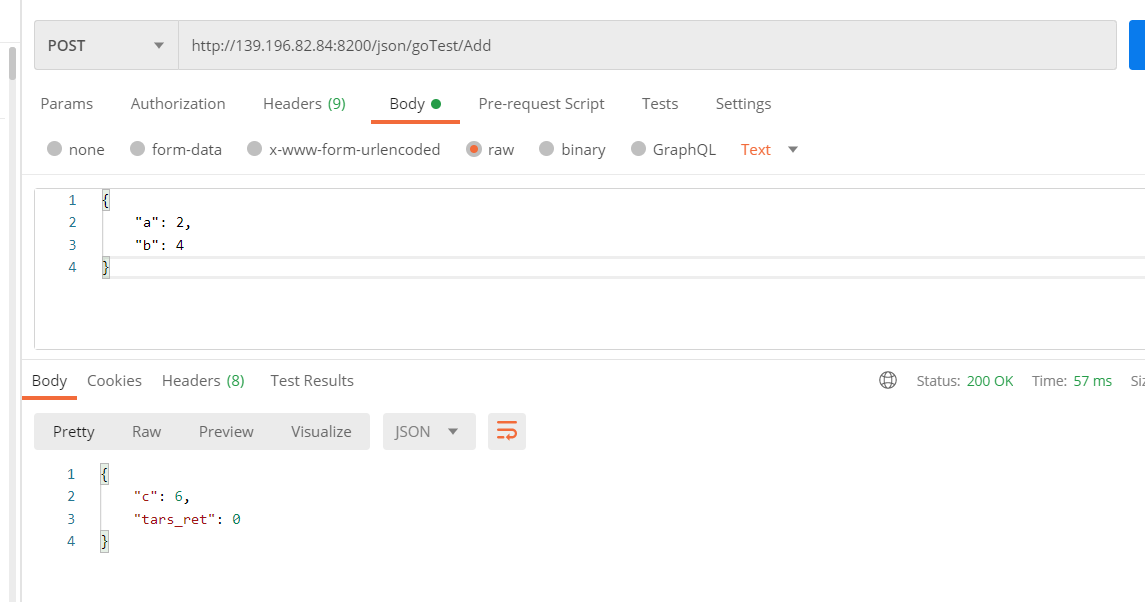
http://139.196.82.84:8200/json/goTest/Add

1.http://139.196.82.84:8200 对应网关接口
2.json:定位json请求方式
3.goTest:对应上面配置文件里  goTest = GoApp.HelloGo.SayHelloObj
4.Add:SayHello.tars里面定义的方法


请求内容:
{
    "a": 2,
    "b": 4
}

返回值:
{
    "c": 6,
    "tars_ret": 0
}
1
2
3
4
5
6
7
8
9
10
11
12
13
14
15
16
17
18
19
2
3
4
5
6
7
8
9
10
11
12
13
14
15
16
17
18
19